Friday, July 24, 2015
Ducati: The result of aluminium clutch basket and steel plates
When I first saw this 2003 749S at 27,000km, I inspected the clutch and found it had a steel plate set (meaning the friction plate base material is steel, not aluminium) with an original aluminium basket. But there wasn't a huge amount of wear, and it as still working, so it was left as was.
I saw it a couple of weeks ago at 58,000km and this was the result. I forgot to take a photo of the plate tangs, but they they were also very worn. If it was a bigger engine I expect this would have happened sooner.
It wasn't this bad at 42,000km, when I last had it out. At that point I replaced the pushrod and needle roller bearing due to wear, and I had to do them again with the basket at 58,000km. Maybe the worn basket and associated movement allowed the pushrod to move around, but it seemed rather odd that it had done the pushrod in such a short time.
.
Friday, July 10, 2015
Further comment on the Ducati ST3 crank slot incorrectly machined.
.
I thought I'd put up a photo to better explain what I was talking about with the incorrectly machined crank slots, using a photo of a crank.
The crank has two slots machined in the end of it to locate the factory locking tool, and you also use these to locate the turning tools. I've never seen these slots machined off before (not once that i can recall), but these ones certainly were. It would either be an error in or damage to the machining jig I expect. I doubt anyone made the decision to machine them 10 degrees off, as it would be a simple production process.
In the pic you can see the two slots for the tool (red arrows), the alignment slot used to align the flywheel dot (yellow circle) and the timing gear keyway (green circle). The timing and cam pulleys appeared to all be correctly aligned, but I don't recall if this bike had a timing window to see if the flywheel marks lined up with the pointer, or if it was one of the later threaded plug covers. I would expect all these slots would be machined in pretty much one pass though.
As a consequence, using the factory cam timing tools would see the crank locked in the wrong place.
The only way you would know is by doing what I did, so it's not something that would come up often. Using the tools as intended would see this result, but it would be unintended and unknown. The assumption that the tool is right is the assumption you work with when using any tool pretty much, unless anecdotal evidence shows you otherwise. This is the first anecdotal evidence of incorrectly machined slots that I have seen.
Saturday, July 4, 2015
Thin base gaskets for Ducati 996
I recently had some thin base gaskets for the 996 laser cut locally. I sourced some 0.20 and 0.25mm shim sheet, and the laser cutter had some 0.30mm in stock, so now I have quite a few of each in stock. Unfortunately, the laser cutting process has left quite a bit of flash on one side, so I'm a bit disappointed in them not being overly saleable as is. Especially as I have to charge $27.50 each for them. But I now have a source of them, so if anyone wants any, they're there.
I fitted some to an ST4S engine I was rebuilding (the catalyst for getting them cut) and the 0.20mm thickness gave 1.00mm squish. Some will need the 0.25 or 0.30mm.
Ducati ST3 front sprocket incorrect position and other wierdness.
I had an ST3 in this week for a big service, and found a few things along the way that made me wonder if I was doing it right.
First of all, it had no opening clearance on 5 of the 6 valves. Coincidently, it was the horizontal exhaust opener that had clearance, which is also the one I have seen with no clearance on a couple at around this many km (40,000) previously, requiring replacement of cam and rocker. But this one was ok.
I checked the vertical first, and with all valves having no clearance, I was starting to wonder if I was doing it right frankly. There wasn't excessive drag on the cams, such as you get when the valve is receding and the closing spring is forcing the rocker onto the cam and wearing both (as seen previously). It was more like they'd been set that way. The closers were all around 0.25mm, so all round it was pretty crappy.
The ST3 inlet valves have very soft closing springs, so you can easily force a 'too thick' feeler gauge in between the rocker and opening shim when checking the opening clearance without really noticing it. I gently lever the closing rocker up with a screwdriver to make sure the valve is closed while checking the opening clearance, just to make sure. I do the same when checking the closing clearance to get the zero setting on my dial gauge. For a model allegedly combining the best of 4V performance and 2V maintenance cost, I find the ST3 the most annoying to do valve clearance adjustments on. Apart from the somewhat crappy access to the vertical exhaust, the ST4/S is easier imo.
Another thing I've noticed valve clearance wise on the ST3 is that some of them (but not a consistant early vs late or the like grouping) need a total combined inlet clearance of 0.25mm (0.010", or 10 thou), or you can feel the cam binding as you rotate it. Usually I use 0.10mm (4 thou) on both inlet opening and closing, but some of them need 0.13mm (5 thou) on both to stop the binding. No idea why, just something I've seen. The exhausts seem happy enough with the usual opening 0.15mm (6 thou) and closing 0.05 - 0.07mm (2 - 3 thou) though.
Given the owner had commented about the bad tune up at its last service (done somewhere else), and this was an early ST3, I thought I'd check the cam timing. It's a fairly quick job, but it's something owners will often see no benefit in them paying for, so I don't do it as a matter of course. But this time I sort of had a feeling I should do it. I find it quite surprising how often my "probably should do that" urge leads to a "wtf" moment and subsequent fix.
Again things turned to weird fairly quickly. I use a Vee Two engine turning/degree wheel holding tool, and with it TDC for either cylinder is with one of the handles either vertical or horizontal. This is because the two slots in the end of the crank are machined in the same place on all cranks, and these slots are used by the factory cam timing tools to lock the crank.
Except for this one. This is what I got:
The slots are 10 degrees off (retarded), something I've never seen before. I rechecked my TDC (done using a piston stop), but no matter how hard I tried to find a mistake, I couldn't. Even the visual "watch the piston move" test showed it was about right. So I submitted to the reality and moved forward. The 10 degree offset didn't really correspond to the vertical cam though, which was -7/79 (133 degree inlet c/l) at 1mm lift, or 19 degrees retarded. I don't think the factory tools would have it 9 degrees off (allowing for the 10 degree slot error), but could be wrong. Actually, just checking my old ST3 cam timing report, it was 123 or 9 degrees retarded on the vertical as delivered. Anyway, it's now at 113 degrees, or 1 degree advanced.
The horizontal inlet was 9 degrees off (retarded), which is consistant with the crank slot error. Now it too is at 113.
From there on the set up was pretty straight forward. I redid the TPS baseline setting (was 110mV), and 2.3 degrees via the diagnostic tool was actually 337mV. I wound one of the air bleeds in quite a bit from where it was, with the running balance ok, and the idle trimmer went from +5 to -5 for 5% CO. Seemed to ride like it should, hopefully the owner will be of the same opinion.
The next issue is one that I have seen before. I had a 2006 ST3 in sometime ago that needed chain and sprockets. I removed the front (countershaft) sprocket and found the chain had been wearing on the head of the oil gallery plug (an M6 cap head screw) behind the sprocket. Assuming this wasn't meant to be happening, I had a bit of a look-see which showed offset wear (to the inside, or RH) on the chain slider on top of the swingarm and came to the following (longwinded) conclusion.
When they introduced the 916 in 1994, the gearbox output shaft had a new part # as compared to the other big block engines (900, 906, 907, 851 and 888). Later, when the M900ie appeared in 2000 with the "748" close ratio gearbox, it had a front sprocket that has the teeth centred pretty much, instead of being offset to the outer (LH) edge. The offset was 5mm, which as it turns out is how much longer the "916" series output shaft is compared to the 900, 906, 907, 851 and 888. This longer output shaft was then used in pretty much every new model, the next of which was the ST2.
When the Testastretta appeared, with the dual row ball bearing supporting the output shaft behind the front sprocket and large nut holding the front sprocket on, it too took on the longer output shaft positioning for the sprocket, as that's what the chassis required. To achieve this, there is a spacer/seal runner behind the front sprocket that is pulled up between the bearing inner and sprocket by the nut and its 190Nm.
This spacer is the same thickness on all the Testastretta models, and when the Monster series was revised in 2001 (S4) and 2002 (900) to the ST based chassis, these big block models used the 5mm longer shaft as per the ST4 and ST2 they were based on. In 2003, the 900 became the 1000, with the Testastretta's bottom end and therefore front sprocket location method. For the M1000, being based on the ST, there was no sprocket alignment issue as its chassis was designed around this front sprocket location.
However, the 1000SSie chassis was still that of the 900SSie, which itself was much the same as the 900SS from 1991. Including front and rear sprocket location. So, with the Testastretta based bottom end, the 1000SSie required a 5mm thinner spacer/seal runner to move the sprocket in 5mm to replicate the 1991 - 2002 position.
This gives two spacer/seal runner part #, being 71312041A (1000SSie) and 71311571A (everything else, supersedes to 71313931A) And, as usual when there's two of something, inevitably the wrong one gets fitted somewhere along the line. For these spacers, that appears to be the ST3. The part I'm talking about is # 13 in the diagram below.
The photo below gives the first visual clue: the length of output shaft protruding through the nut. It's more than I would expect to see on anything other than a 1000SSie.
This bike is a 2004 model, so there's no oil gallery plug behind the sprocket for the chain to wear away. But the offset wear on the chain slider on top of the swingarm was as expected. If I put my little laser chain aligning tool on the side of the front sprocket and aim it at the rear sprocket (assuming the rear is in about the right place), you will see the laser dot hitting the sprocket teeth. It should be hitting the outer plate of the chain.
To solve this, we need to move the sprocket out 5mm. Typically, either spacer/seal runner part # is ex Italy, giving the obvious option of machining a 5mm thick spacer to go between original spacer and sprocket. This presents a problem of suitable material at hand, as it needs to be 25 x 35 x 5 and steel. I'm rather suss of making this sort of thing from aluminium, especially when it gets 190Nm of squash on it. The first time I used an old nut (possibly primary drive) narrowed to the right thickness. This time I went on the scrounge to the fencing place just up the road (often useful), and found some big arse gal nuts. From one of these I turned up the required spacer and all was good again. I'm going to back order the correct part for stock, just so next time i have what I need at hand.
As to whether or not all ST3 have this issue, I don't know. I've not heard of it before (see below), and it's the sort of thing you only notice when it causes something noticeable. The 2006 model with its oil gallery plug gave me something noticeable, but the 2004 wouldn't have made it obvious. From now on, I'll look at every ST3 I get in.
**A quick google shows others have noticed unusual wear, but I don't think anyone else has come to this conclusion. Sample size is what brings the anecdotal evidence, and that's easier for someone like me.
Saturday, May 2, 2015
"Do you really want to know about expansion chambers"
A great technical article by Gordon Jennings from way back in the day. Allow an hour or so.
Do you really want to know about expansion chambers
Friday, May 1, 2015
Ducati 888 SP4 charging system issue and influence of bad fuel pump.
I had a customer drop in this week with his 888 SP4. The charge light on the dash had been coming on and staying on above idle, and the rpm required to make it go out was getting higher and higher. A voltage check at the battery showed it struggling to get to 13 V at 5,000 rpm, so clearly something was wrong.
I did the usual checks, and with a rectifier connected directly between alternator and battery to check the loaded potential alternator output (unregulated), the most it had was 13.1 V. Usually, you give it a quick rev, watch the voltage go to 15 - 16 volts then shut it down before the battery throws a hissy fit. Sadly, 13.1 volts was not going to induce any hissy. Well, not in the battery anyway.
I tracked down a new alternator at Frasers in Perth, which was air bagged over and fitted. Unfortunately, the old alternator looked great, something of a bad omen as it turned out. I ran the rectifier test again, and this time we had a mind blowing 13.5 V. This made me rather sad, and very perplexed. I tried another battery just in case, using one of my spares that had been charged the previous week. You need to make sure you have a fully charged battery fitted when diagnosing charging faults, but even with this fitted there was no change.
The 851 and 888 SP use the single phase "narrow" alternator, the same as that fitted to the 350, 400, 600 and 750 engines pre 1998 (and 900 until mid 1992 or so). The normal 851 and 888 use the "wide" alternator, also fitted to the 906, 907, 1993 on 900 and the later 748 and 916. I had a stator only in a box with the wide part #, but I couldn't find the complete wide alternator I have (I saw it in a box a month or so ago), so I wasn't actually sure what was in the SP until the new one arrived and the old came out. The photo below, which I stole from an Ebay ad, shows a wide rotor single phase alternator.
Turns out the wide stator is the same width as the narrow stator, with the steel part of the stator being 30 mm wide. This fits with the Electrexworld listing showing a 30 mm stator (which again was confusing me). But, the rotor is wider. The narrow rotor is 30 mm total width, and the magnet section is 24 mm wide. The wide rotor is around 40 mm wide I believe. I don't actually have one to hand to measure (it's in a plastic crate somewhere), but it's something like that.
Given that I had a maximum of 13.5 volts, I figured I'd best go looking for the rest, if indeed any more existed. This is the same alt used in a 600 or 750, and I have seen them go 14.3 V regulated easily, and much higher when running through just a rectifier. I was struggling to think of places for the extra to go. I tried lights on/off, which gave a steady 0.2 V change. Most things will drop and then recover the voltage when you turn the lights on, but a drop and no recovery meant there wasn't anything more to be had.
The main difference I could think of between an M600 and an 888 SP4 is that the SP4 is injected. So with it running and the tank raised, I popped the fuel pump connector and watched the battery voltage as it ran down to a fuel-less stall. A 0.4 V increase to 13.9 V showed a potential worth pursuing.
This bike has only done 9,000 km in its 23 year lifetime, but the fuel filter was dated 06 from memory, indicating it was 8 - 9 years old at most. The little round yellow filter on the bottom of the pump was damaged, with a few holes in the bottom section. Given there was quite a bit of loose debris in the bottom of the tank, it had possibly been sucking grit even though the pump had a steel mesh screen on its entry. The fuel filter (a KL145 in this 1992 model) was so blocked that I couldn't blow through it at all. Along with the filter I replaced the hoses with some R10 spec and assembled it enough to try it again to see how many volts I'd found. The result was maybe 0. 05, summarised as pretty much none.
At this point I was running it with the regulator connected again, so we had around 13.2 volts at the battery up at 4 - 5,000 rpm.
The SP4 has a "small" pump (not the larger pump of the 1992 and prior bikes), which is replaceable with the California Cycleworks FP-916. Originally a Walbro pump, it does have individual electrical spade terminals (earth narrower than +ve), unlike the later style replicated by the FP-916 which has two spades the same wide carried in a black plastic connector block. I cut a black plastic connector from a dead fuel level sender (never throw anything out!) and rigged it to work for a test. Just turning the key on produced a pump sound very different to the previous, and firing it showed 13.6 V at around 4,000 rpm. Switching the lights on gave the expected (hoped) drop and recover, and it would hold 13.6 V no matter what.
So I swapped the terminals on the pump power wires to suit those required by the black plastic connector and fitted the pump into its hole for the last time. The 1992 models use the same rubber pump holder as the 916 series, but it goes into a round holed steel plate holder in the tank, with ridges moulded into the rubber holding it in. It's a complete bastard to remove with little access behind it, and even my nitrile gloves were getting holed and filling with petrol in the end, which I really hate. And the tops of my forearms, having been rubbed against the underside of the tank cap recess repeatedly, were quite red and angry. But, finally, it was back together and I was much relieved.
The charge light was now not showing at all, even at idle, and a stable 13.6 V, while less than I like to see, was better than what it had when it came in. The voltage drops in the loom between regulator and battery were about 0.15 V total on both +ve and -ve, pretty impressive for a 23 year old wiring loom. I often see up to 1 V in bikes 10 years old.
While the alternator itself didn't fix the issue, it was certainly partly to blame. But it still was an expensive half fix. And the impact of the fuel pump issue on the battery charge voltage is something I haven't ever seen before. Most of these charging systems, with a good regulator and wiring, will knock out 14.1 - 14.3 V all day every day. People like to give the old SP alternators a bad rap total power wise, but I was amazed to find it actually offering so little maximum output voltage in an unregulated test. It really did stagger me, to the point of thinking there's still something I am missing. But, I did learn quite a bit over the course of a rather frustrating day, and that's always a good outcome.
Saturday, April 18, 2015
Helibars clip ons on a 748 / 916 / 996 / 998
I had a customer who wanted some higher bars on her 748. I enquired about a few of the options, and came across the Helibars TS07026 clip ons. Available locally, they're at the expensive end of the range at $480, but they come as a guaranteed straight fit. They have the holes drilled for switch blocks, meaning you don't need to mess around with that (always an annoying part) and the labour time it entails. Once fitted the only clearance issue I noted was between the tops of my fingers and the mirrors at full lock, and that was more a surprise touch than real issue.
I fitted the LH side, and took a photo from behind for a comparison with the std RH side. With a very obvious shallower angle, they're advertised as 44mm higher, 25mm further back and 30mm wider.
The only issue I had fitting them was with the front brake hose. It did seem like it was too long anyway, but the angle of the banjo meant that I was very limited in options. Running forward as shown, it looked a bit odd, but cleared everything and didn't get jammed at full lock. The instructions (which I forgot to read until I was done) specified running the throttle cable under the front brake master cylinder. The drilled hole in the handle bar for the throttle housing locating pin would have required this, but the housing on this bike was pinless. And over the top seemed more natural when I was lining it all up.
To further help with the comfort, I pushed the forks down through the triple clamps 13 mm (they were at the specified setting) so that the tops of the tubes were flush with the top triple at the inner edge. Then, in the rather futile hope that the rear suspension rod rose joints would actually move in the rod, I removed the rod to try to adjust it. It was at 262 mm centre to centre, and after much heat and Inox I finally managed to get one end to wind in to give 259 mm. This gave us a 10 mm drop in ride height at the rear axle. Overall, this combined 23 mm change in attitude rotates the bike approximately 1 degree.
The owner found the most noticeable change to be in the angle of her neck, which combined with the general reduction in forward weight will hopefully see her enjoying the bike more regularly.
Sunday, March 8, 2015
Ducati Supersport mufflers carburettor models vs ie
I took some photos of Supersport mufflers to give a comparison of what will fit what and how. The models compared here are 1990 to 1997 900SS (carburettor) and 1998 - 2007 620, 750, 800, 900 and 1000SSie. All the SSie mufflers are the same. The 1990 to 1997 900SS mufflers are the same as the 851 from 1989 onwards, so they're more correctly 851 mufflers. The 888 mufflers also fit, and I believe they were fitted to some 900SS/SP that went only to the USA (generally).
As a note, the 1991 - 1997 750SS mufflers are unique, due to the header pipe size.
The 851 muffler is 100mm diameter, the 888 muffler 110mm from memory, and the 888 muffler doesn't have a removable end baffle like the 851 muffler.
In this comparison, we have a Ducati Performance (by Remus) muffler to suit SSie at the top and a polished 851 muffler at the bottom.
SSie muffler fitted to 851, as I didn't have a 900SS to hand
851/900SS muffler fitted to 750SSie. The muffler was almost touching the swingarm at the leading edge of the canister.
Top view of SSie muffler (bottom) on 851, showing how much longer they are overall.
Friday, January 16, 2015
Photo of that peg-bracket to swingarm support idea
This is on the SS. I'm sure I had used them on an SS before, but it certainly didn't line up. Maybe the lower holes are for the ST series. Top holes worked for Minnie, where they have been used before. Definitely been on two of my bikes, and I've only owned this one SS. 888 and ST2 also had engines out, 888 and Monster should be the same. It has an aluminium spike on the other side going into the swingarm.
I also worked out the photos are cloudy because my iPhone lens was dirty.
Tuesday, December 30, 2014
Once again, Minnie finds herself without a motor
It's in the box!
She almost got lucky with the 400SS motor yesterday, but then some idiot decided to give it a leakdown test, exposing an exhaust valve not doing a great job of sealing, and some rings that couldn't be called great team players.
I'll do a post on building a shipping crate to fit a 2V motor at some point. I've even got a cutting list.
The 400SS has a similarly forlorn look about it, slumming it with nothing, but the old 600 cases I've had kicking around for years to hold it together.
Christmas Trading Hours
(or lack thereof).
Monday December 22nd is my last day in the factory until Monday January 19th.
Current "next booking spot' is around March 14 or so, I forget now.
To quote Vicki Smith:
Here's wishing that whatever you celebrate, and however you choose to do
it, that it's everything you hoped for.
Happy Holidays everybody!
Sunday, September 14, 2014
Closed September 25 to October 20
As it says, I will be closed from Thursday September 25 until Monday October 20.
Sunday, July 27, 2014
Anyone want a hot 750 2V motor?
.
Minnie's 750 motor is on Ebay. It just a bit surplus to my long term plans, with the intention being to put the 400 motor from the SS into Minnie to allow a little 400 playing before ultimately flogging her off.
750 2V motor
I've also listed the 900 crankcases I have, which have been sitting around mocking me for the best part of 10 years I'd say. Probably longer, now that I think about it. I bought them to build a 944 or the like for the 851, but we all know how that turned out.
900 crankcases
I've been toying with the idea of selling the 851 too. It has sat for over 9 years now, and I don't see a time when I can justify spending the time I need to to get it back on the road. Given it's an '89 model it can be ridden on a club permit this year, and that was luring me to get back on it. But it needs a full service and tyres and probably more once I get into it. Given I never walk into the factory without a customer's bike there to work on, any time I spend on the 851 is time not charged out. It might be more a mental issue than a monetary one, but it's still an issue.
And then there's all the 851 parts I have.
I'm sure I'd regret it, but sometimes ridding yourself of the weight of best intentions left unfilled can be amazingly refreshing.
Friday, July 11, 2014
GSXR fork cartridges in 41mm Showa adjustable forks
.
Along the lines of the SC1000 post below, there have been quite a few threads on fitting GSXR 600/750 fork cartridges to the Showa 41mm adjustable forks from the 851, 888, 900SS and M900. So at risk of driving up the prices of s/h GSXR 750 forks, here's a couple of links. Appears to be a very good mod, and pretty much drop in* to these forks.
http://www.ducati.ms/forums/57-supersport/149199-gsxr-cartridges-7.html
http://www.ducati.ms/forums/57-supersport/142215-k4-5-gsx-r-750-fork-internals-carb-ss-forks.html
* as long as you aren't too precious about the whole "drop in" thing and can work around a few things to be sorted.
More on the craptacular Marocchi 43mm forks: SC1000, Monster,etc
.
A fellow named Impusive_Duc has started a thread on Ducati MS about the Marzocchi 43mm forks as fitted to his SC1000 and his pursuit to make them better. He's getting quite carried away with it, something I always enjoy seeing.
http://www.ducati.ms/forums/77-sport-classic/393201-project-100-ohlins-bust-gsxr-cartridges-sc1000-stock-marzocchi-forks-3.html
Friday, July 4, 2014
Some photos from along the way
.
My first interaction with Moto Italiano I guess you could say, this 888 on display at the 1993 Melbourne Hot Rod show. That sign was still around until the end, sitting upstairs on the mezzanine. It probably went into the bin like everything else did.
March 7, 1995: Trev offers me a bike to take home for the night, a 906 Paso in to be sold on behalf of a customer. I was going to drop off some brake parts from the shop ute to a mate for reconditioning, so it seemed a good idea. My first question was "Is it insured". "Of course it's insured " said Trev.
Hmmmm.
This is what a 906 Paso looks like after it has been wheelied into (unintentionally, of course, on both 'wheelie' and 'into' counts) the RH rear corner of a City of Melbourne mobile works caravan. Allegedly the noise it made was that of an explosion. Which is kind of what the front end appeared to have done.

March 1998: My Sport 1100i, The first and only new bike I will ever buy. It's quite a nice feeling removing your own bike from its crate. Pre modifications and crashing. And proving I hadn't learnt anything about the benefits of worthwhile investment. Actually my first official borrowing of money, all $15,500 of it. I bought it direct from Stolarski, when they were unloading the bikes they still had when they lost the Australian importership. I could have had a Daytona RS for $18,250 from memory. In hindsight, I should have found out how much a 900SSie would cost me. Or one of the last 1997 900SS. Would have been much more relevant.
My first interaction with Moto Italiano I guess you could say, this 888 on display at the 1993 Melbourne Hot Rod show. That sign was still around until the end, sitting upstairs on the mezzanine. It probably went into the bin like everything else did.
March 7, 1995: Trev offers me a bike to take home for the night, a 906 Paso in to be sold on behalf of a customer. I was going to drop off some brake parts from the shop ute to a mate for reconditioning, so it seemed a good idea. My first question was "Is it insured". "Of course it's insured " said Trev.
Hmmmm.
This is what a 906 Paso looks like after it has been wheelied into (unintentionally, of course, on both 'wheelie' and 'into' counts) the RH rear corner of a City of Melbourne mobile works caravan. Allegedly the noise it made was that of an explosion. Which is kind of what the front end appeared to have done.

Look at the next photo:
Then try to say "bruised and lacerated scrotum" without smirking. I can't.
What followed was my first ride in an ambulance and my first time on a trolley being wheeled into an emergency room. You know those scenes in movies where they show the view of the ceiling with passing lights that someone sees as they get wheeled into the ER? That's 100% life like, and quite bizarre.
And the first time I had all my clothes cut off on the ER table with the great big "cut everything" scissors. Cost me my first leather jacket and my TISM "Great Truckin' Songs Of The Renaissance" T-shirt.
And because the ER doctors were:
1/ paranoid about neck injury
and
2/ female
the probing for my injuries, done with tenderness around neck level, slowly degenerated into pointed jabbing by the time they'd reached the ball zone. Given that, by this stage, the level of nadular pain was at hyperventilating levels, the true depth of the evening's deviation from previously laid plans was born out by the stabbing of fingers followed by the ever loving "Does that hurt?"
"Whada you reckon?"
If I had any ability to make my stomach muscles contract at all I might have tried to raise myself up and go them. But I was helpless, naked and cold.
After they started pumping morphine into me one of the doctors asked if I was feeling a bit spacey. I think I suggested she call her dealer, as it wasn't kicking in. Thus began my first interaction with the world of opiates. It was never something I really enjoyed; while the dopey fog of sleepiness wasn't so bad, the nightmares and itching were.
That night I ended up with 3 stitches in the aforementioned scrotum. I don't think I'll ever forget the stinging pain of the local anaesthetic needle as they went my nads like a pin cushion, or the sensation of the stitches going in. And out, and in, and out. The local removed the pain, but not the feeling. It's rather odd.
A few days later I woke from my first general anaesthetic with a couple of little wires in my wrist, to hold the end of the (I think) radius in place. It was quite a weird sight seeing two little pins poking out of my arm. I expected that a hole in your skin like that would bleed.
A week or so later the stitches came out, a task performed by a male nurse who had, at least, an appreciation of and for the delicacies at hand. The pins came out a few months later, when I watched a doctor open a sterilised package containing a pair of pliers much the same as I had in my toolbox. When he couldn't get the wires to move he actually put my hand on the desk and then put his knee on top on it to hold it down, before realising (possibly due to the looks from myself and my mother) that perhaps that wasn't the most correct way of doing things. Turned out a quick twist was all they needed to free themselves, and then they came out. Followed by a couple of drops of blood. Again, I couldn't believe there wasn't a torrent of it.
One thing that came of it was a change in my attitude. I'd always been a bit of a gunna, while never actually doing anything. Well, I did manage to finish rebuilding a Monaro a few years before, but up till then I'd pretty much just floated through life without really getting into anything. So while I had a few weeks off, I came to the conclusion that I should get into something. And that something became motorcycles. Although, the way I went about it may seem a little odd, given the surroundings.
Although it did take until the second time my parents got a phone call from an ER saying "We have your son here..." for me to appreciate the impact it had on them.
And I still contend it's one of the better things you can do with/to a Paso.
June 1995: What you get for $8,000.
Well, it came with all the other parts needed to assemble it pretty much. A customer was having this resto done, and wanted to bail on it. At that point most of my friends were getting into property, and over the next 5 years the value of the Melbourne property market generally doubled. As I sit here 19 years later, the long term impact of that decision is clear any time I look at our mortgage.
Some Saturdays, my play day, I'd go into work and just look at it, wondering how I was ever going to get it finished. But, by April 1997, I had this:
The colour choice put a few people off, and, to add weight to the general opinion of dislike, it's in one of Ian Falloon's books in black and white (and uncredited). But I loved it.
I had a preview to how it would ride when I rode Trev's V7 Special (actually an 850GT or Eldorado painted as a V7) in to the 1995 Italian Motorcycle Concourse (November, Lygon St). As long as you didn't want to do anything too quickly, it was fine. I'm guessing Trev rode either the SB6 or Mantra (behind the V7), as we were the Australian Bimota importers at that time. You can see the Monaro behind them, my first love in orange.
And I did find a few years later that you could comfortably scrape the centre stand on the ground without falling off. It really was a very cool bike, but in the end it was the 6 or so hours it took to clean it that wore me down, so I stopped riding it and eventually sold it. And I haven't seen it since, although I know it is still around.
February 1996: Bearded up and giving some love to an 888.
It was 20 years ago today........
That I started on this Italian motorcycle adventure. July 4, 1994. I had been working on cars with a fellow named Rob (now the mechanical side of Guzzi Spares Australia) and he owned a 907. He found himself working at Moto Italiano after taking the 907 in for a service and finding they were in need of a mechanic. Then about a month after he started, the other mechanic left. So he rang me to see if I wanted to try bikes. I went and had a look and a chat and then got a call to say that there was a Ducati training course in a bit over a week and if I was interested I should really be there. I was, and then I was.
The first day was an M900 service, and my introduction to 2V desmo. I learnt some new stuff (which I promptly forgot). Day two was a first service on an 888, back in the days when first service meant a full valve clearance service. Actually, the only difference between a 1,000km service and a 20,000km service (1994 model, probably 15,000km for one year only) was a fork oil change, now that I think about it. As we were pulling it apart, I opened the throttles, looked down the inlet ports and fell in love. As an engine guy, it was a most wonderful sight. I still service that bike.
The training course also coincided with the first 916 in Australia being at the dealership. I had no idea what it was, but everyone else seemed to think it was pretty special.
Of course, by the first time I had to do valve clearances on a Ducati (a 2V, probably an SS) I stood there with a dopey look trying to remember what it was I was meant to do. Funny, but I find 2V valve clearances almost therapeutic these days.
I think the first bike I rode after servicing it was a Moto Guzzi T3. Probably a dark green one. Compared to the Ducati, the Guzzi were pretty similar to a car in many ways so much of it made sense servicing wise. But I hadn't done a lot of road riding at all up to that point, and when I got back to the workshop I asked Rob if he could go for a ride on it because there just had to be something wrong with it. Nope, just a Guzzi. I did come to love them. Well, most of them. Some anyway.
Monday, June 30, 2014
Saturday, June 14, 2014
Lovely orange 900SL
.
A photo posted by SpikeC on the Monster forum. Apart from the angle of the black lower section (should be the same angle as the bottom edge of the seat base imo), I really do like this. Even the gold frame and wheels seem to fit in well.
I do like orange.
Similar colour to my old Monaro, which I repainted Indinapolis orange, and the Eldorado, which was Adlide orange. I found Adlide orange in a paint catalogue and it was listed as a "fleet colour" from memory. But googling it shows it's a Torana colour. Not sure which model though. Both these oranges changed quite a lot depending on the light. Deep orange in the shade (like the SS above), much more yellow in the sun.
.
Inlet trumpet design and inlet length info from David Vizard
.
I've been hanging out a bit lately on the Do The Ton forum. I quite like the aesthetic side of the custom scene and find some jealousy for the ability of those who do it well, not being overly creative myself. Although the technical side of it is often rather frustrating, and while many of those involved seem completely oblivious to the consequences of the supreme low budgetness often employed, I just can't get excited about a set of $100 shocks.
Anyway, in the Engines section I found a post with some links to work by David Vizard. Who is David Vizard you ask? davidvizardseminars.com calls him "a Race Engine Building and Performance Tuning Guru. Author of many technical books, he now lectures to engineering audiences worldwide ..." He has done lots of stuff. The images are found on the Eurospares website.
The two links I found of interest were for inlet trumpet design and inlet tract length, as below. Best to download the inlet trumpet design page from the link so you can magnify it to see all the detail.
The thing I find interesting about the inlet length diagram is that 10,000 rpm is given as 10 inches, or 250 mm. There's quite a lot of bikes that are much less than that, and a big part of that is available space. 8,000 rpm is given as 12 inches or 300 mm, which is a lot of length to find on a motorcycle. I'm sure the "long" manifold system on the Mikuni carburetor 2V Ducati motors is not a lot longer than that. Maybe I'd better measure it on Monday.
.
Friday, May 30, 2014
TPS for Keihin FCR
.
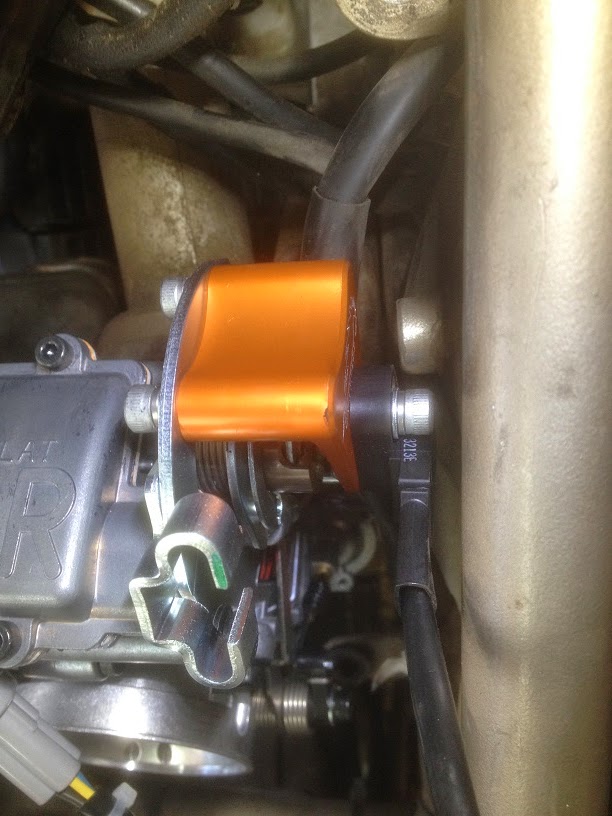
Chris at Cosentino Engineering has been making a TPS mounting kit to suit the Keihin FCR carbs when fitted to the KTMs he plays with, which have a TPS fitted as std I believe. See here for all his bits: Cosentino Engineering
I had Chris send me a kit to see how it would fit to the FCR in the SS and Monsters. The Ducati FCR fitment is a "racked" pair of carbs, as opposed to the two single carbs the KTM has. But the TPS fit is much the same. Although I believe Chris is having some brackets anodised red instead of the usual orange to appease those who like that sort of thing.
The TPS itself is a KTM part and very affordable in the grand scheme of things. And while I don't have a source for the 3 pin rounded triangular style connector on the end of it (haven't bothered to look, frankly), I do have a very functional set of wire cutters.
One change required to the Ducati FCR set is the accelerator pump arm. The original flat arm will foul the little nipple that fixes to the end of the throttle shaft, not allowing the throttle to fully close. Replacing it with a round wire arm (a GSXR part from the FCR diagrams) fixes this issue, and it's not very expensive. You can see the round wire arm in the following photos.
Some may be wondering why you would want to fit a TPS, and the answer is in combination with a 3D programmable ignition system, like the Ignitech, you can have a spark map with the benefits to fuel economy and response that this gives. Liam at Fast Bike Gear in New Zealand has written a great expanded Ignitech user guide which includes info on doing this.
Fitted to Minnie the Monster it looks like below. Plenty of clearance to the frame and everything else. The photos are a bit fuzzy, so I apologise for that. Maybe my lens is dirty.
Fitted to the 400SS, you can see the boss on the inside of the frame that holds the upper fairing mount on a half faired bike. The mount bracket goes out to the rear, so away from the TPS, but it may need trimming and a shallow head screw. I was too lazy to try refitting mine to actually check. The wiring you can see hanging usually runs above the boss, and it was definitely in the way. This bike is a '93 model, with the battery reversed as compared to the later models, so that may impact how annoying this cable actually is.
.
Chris at Cosentino Engineering has been making a TPS mounting kit to suit the Keihin FCR carbs when fitted to the KTMs he plays with, which have a TPS fitted as std I believe. See here for all his bits: Cosentino Engineering
I had Chris send me a kit to see how it would fit to the FCR in the SS and Monsters. The Ducati FCR fitment is a "racked" pair of carbs, as opposed to the two single carbs the KTM has. But the TPS fit is much the same. Although I believe Chris is having some brackets anodised red instead of the usual orange to appease those who like that sort of thing.
The TPS itself is a KTM part and very affordable in the grand scheme of things. And while I don't have a source for the 3 pin rounded triangular style connector on the end of it (haven't bothered to look, frankly), I do have a very functional set of wire cutters.
One change required to the Ducati FCR set is the accelerator pump arm. The original flat arm will foul the little nipple that fixes to the end of the throttle shaft, not allowing the throttle to fully close. Replacing it with a round wire arm (a GSXR part from the FCR diagrams) fixes this issue, and it's not very expensive. You can see the round wire arm in the following photos.
Some may be wondering why you would want to fit a TPS, and the answer is in combination with a 3D programmable ignition system, like the Ignitech, you can have a spark map with the benefits to fuel economy and response that this gives. Liam at Fast Bike Gear in New Zealand has written a great expanded Ignitech user guide which includes info on doing this.
Fitted to the 400SS, you can see the boss on the inside of the frame that holds the upper fairing mount on a half faired bike. The mount bracket goes out to the rear, so away from the TPS, but it may need trimming and a shallow head screw. I was too lazy to try refitting mine to actually check. The wiring you can see hanging usually runs above the boss, and it was definitely in the way. This bike is a '93 model, with the battery reversed as compared to the later models, so that may impact how annoying this cable actually is.
Tuesday, May 27, 2014
Marzocchi 40mm fork design and impact of oil level on spring rate, Part 3: The crap ones
.
It's amazing how a company with such a high end reputation for quality suspension, in many fields, can produce something as crap as these forks. But, as those in business will understand, if someone asks you to make something, why not. And clearly, when Ducati asked Marzocchi to make some upside down forks for the Monster and SS range in 1994, the word most emphasised was cheap. Ie, "Yes, well, they're great, but do you have anything cheaper?"
So what we got were these 40mm forks with a damper cartridge arrangement that is fixed into the fork tubes by the bottom edge of the tube being rolled to fix them. I've often poked quite a bit of fun at them, but it's not really Marzocchi's fault if it's what Ducati wanted. As always, it's amazing the crap Ducati have managed to get away with over the years.
Functionally, the forks have normal style rebound damping, but compression damping in the final 1/3 (or so) of travel only. This leads to quite a bit of initial dive, the sort of thing that catches you out when you grab a handful of front brake at low speed while working through traffic for example.
They were fitted to the Monster (M400, 600 and 750) and SS ranges (400, 600, 750 and 900SS CR) from 1995 until 1999. I have record of two different dimension springs being fitted, but the overall rate calculates at much the same. Being way too soft, and two stage to try to overcome it.
My set of these came from Minnie originally, before I fitted some 41 mm Showa non adjustable forks to her. I did replace the springs at one point, but they've been unused for quite some years now.
I had a little time and curiosity, given my other fork playing, so decided to drag them out and have a looksee.
As I found them, they were fitted with 0.85 kg/mm rate springs fitted with 33 mm of preload and filled with oil to 100 mm. Why they had 33 mm of preload I don't know, but it seems way too much. So I tested them again with 17 mm of preload and the oil level set to 140 mm. The preload tubes in this instance were pieces of 32 mm OD orange electrical conduit. This is much the same size as the original tube, in both OD and thickness. With a wall thickness of 3 mm, it does have a noticeable impact on oil level, especially when compared to the Showa thin wall steel tube preload spacers for example.
Then I dug up some original M600 springs from my stash of oldies. I couldn't find any original preload tubes (long since cut up no doubt), so I cut a piece of orange conduit 120 mm long, which I'm pretty sure is the original length. This gives 13 mm of preload on the original spring. The std oil level is 90 mm, so I began with that, then added more preload (another 20 mm piece of orange goodness), then dropped the oil level to 130 mm with the same extra preload. The orange conduit volume also had an impact here. I calculated that the 20 mm long piece of conduit added the equivalent of 5 mm of oil height to the fork internal volume. Which I'm mentioning as I didn't think of it when originally adding it, but later went "ah" when it appeared the air spring rate may have changed a touch. As ever, it's all the errors you introduce without thinking that catch you out.
And so to a graph. Blue is how I found it: 0.85 kg/mm spring with 35 mm of preload and oil set to 100 mm. Black is with the preload reduced to 17 mm and oil dropped to 140 mm. Red is with the original spring, preload and 90 mm oil level. Green is with preload increased 20 mm and 90 mm oil level. Orange is the same as the green, but with the oil level dropped 40 mm to 130 mm.
The orange and black curves show much more linearity, which is what I'm seeing a lot more of with oil levels reduced by 40 or so mm. The shape of the yellow curve is also influenced by the spring rate, which changes from soft to harder at around 70 mm of compression. With the preload set to 33 mm, this corresponds to 40 mm of fork compression, or just a bit more than the static sag would hopefully be. I have found that the static sag load seems to be in the 45 kg range, conveniently occurring around 35-ish mm of compression for the black, green and yellow curves.
If I add the M900ie 'final' curve, with the 0.85 kg/mm springs running 5 mm of adjuster added preload and oil level set to 155 mm in purple, the orange and black look a bit light on at the top end. Given the black and purple springs are both allegedly 0.85 kg/mm the difference in overall gradient is a bit odd. I'd probably want to go back up in oil height by maybe 20 mm or so to increase the air spring.
Splitting them up for clarity, first a 20 mm increase in preload with the original spring. The difference in static sag with this change should be in the region of 15 mm.
Then a 40 mm drop in oil level. It's only in the last 1/3 of the travel that you'd notice any difference on the road.
The difference a heavier spring makes to the mid travel range is shown in the next graph. Similar end points, but a difference in the middle of around 8 mm for a given load. Black is 0.85 kg/mm, orange original.
Subscribe to:
Posts (Atom)


a.jpg)
a.jpg)
a.jpg)
a.jpg)