Thursday, March 20, 2025

Cagiva Raptor TPS baseline procedure - might also work for a TL1000S.

I had a phone call today from a fella asking if I would work on a Cagiva Raptor. Nope was my response - I've just looked and it's 10 years since I've seen a Raptor. Another of the bikes I really never wanted to work on, and am now more than happy to say no to in an effort to simplify my life. But I figured it'd be worth posting this TPS baseline procedure.

The Raptor was somewhat unloved. Great bike, just not wanted. We did a group demo bike ride back in the day with a Raptor, M900ie, 900SSie, 996 and my R1100S I think. The Raptor steered a bit odd - I found getting my weight as far forward as possible helped a lot, as did opening the throttle early. I expect the V-Raptor, with the lower bars and front fairing-ish design, would have been better. It also used a lot less of the front tyre compared to the rear than other bikes. But certainly nice enough for what it was.

Today's bloke was complaining about the "typical" TL1000S 3,000 - 4,000 rpm poor running issue. I suggested he try the TPS baseline we came up with, but he wasn't confident of getting into that sort of thing himself.

Not any sort of official procedure, but we'd been doing TPS baselines for Ducati models for years so it seemed a worthwhile thing to try. I like procedure and repeatability, and this is really the only way to get it. Even if it means they're all bad in the same way, at least then you can start moving forward with some consistancy. The Suzuki ECU in the Raptors didn't have any idle mixture adjustment function, so it was just a matter of manipulating what you had. I believe the Yoshi box could change them, but we never sold enough of the Raptors to make it worthwhile buying one.

From memory (it's a long time since I did any of this, so it's a bit hazy) there was a LCD display on the dash with 3 lines to indicate TPS setting - you'd plug in a diagnostic connector and set the TPS to have the middle line showing with it idling at the desired rpm - I forget what the desired was now. I like things to be more repeatable than that. So, I think we figured out about what the middle line related to in terms of TPS voltage with the throttle blade fully closed on one that ran well, and made it up from there.

Never be afraid to just make shit up, then modify your procedure until it works as hoped.

Procedure was done with the engine not running, back probing the TPS connector with a multimeter to get the voltage reading. We'd generally do it cold, but if it had to be done hot, so be it. The throttle balance set up afterwards was done using the vacuum take offs from the fuel pressure regulator, with all the other vacuum hose guff connected as per normal.

I don't recall if we'd check the idle mixture with the gas analyser now that I think about it. Maybe we did, but as it wasn't anything we could do anything about we didn't bother? Hopefully you'd see 3 to 5% CO - that's where things tend to idle well. But I really don't remember now. Air bleeds were fairly close to full in generally, and winding them out will just lean it out.  We may have been closer to idling too high than too low.

Anyway, good luck, and hope it's of use.
 
 
Raptor / Navigator TPS Setting Procedure

1. Remove airbox, etc, to allow complete access to throttle bodies.

2. Wind idle adjusting knob on LH side off at least two turns.

3. Disconnect throttle linkage at rear butterfly, taking care to remove the plastic washer and spring.

4. Wind rear cylinder throttle stop screw off to allow butterfly to shut completely.  Snap the throttle shut to make sure it can close fully, but have it closed gently with a little push when setting, not jammed.   

(This may have a big rubber cap thingy over it going by photos I have found on line of the throttle bodies.  It's on the other side of the rear throttle body to the TPS)

5. Adjust TPS to give 1.080 volts between brown/black and grey/orange wires – front and centre. The ignition must be turned on to do this.

6. Mark screws with red paint once tightened.

7. Wind idle stop screw back in to give 1.125 volts between the two wires. This is the idle setting.

8. Reconnect throttle linkage.

9. Wind air bleed screws in full closed and set running balance. Connect vacuum gauges to fuel pressure regulator vacuum ports. Leave fuel pressure regulator vacuum lines open. Remove the other vacuum line coming from the rear throttle body next to the fuel pressure reg take off at the check valve on the left hand side and plug. Keep all other vacuum lines/electrical connectors to the airbox, etc connected.

10. Once running balance is set, set idle balance by winding up the idle stop for the front cylinder using the idle adjustment knob. Be sure not to wind idle adjustment knob too far and open throttles off rear cylinder stop screw. This may not result in correct balance, as close as possible is all that is required.

11. Finish idle balance with air bleeds if required. Idle speed should be correct without needing air bleeds to raise speed.

12. Refit all bits.

Monday, May 1, 2023

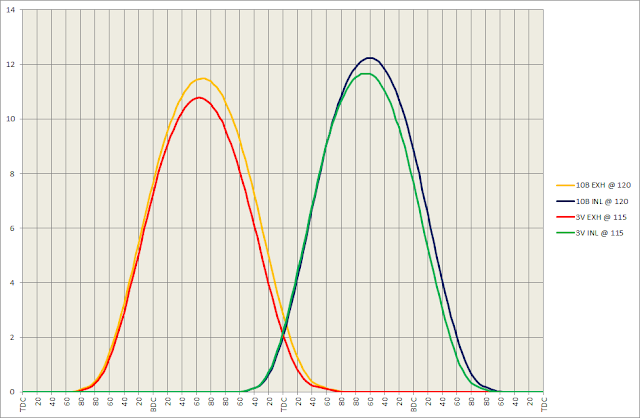
Ducati DS Cam profile comparison

DS version of the 2V Cam profile comparison -> Click here for link using the same rig as previously modified very slightly to take the M659 head.  And prompting me to buy a new degree wheel.


The DS cams I have to hand are the M659/696/796 8P and the 1100Evo 10B.  George at D Moto sent me a pair of 3V, which are the early 1000 cams.  The later 1000 cams are 7V, and i believe there must also be another version as there are still 3 active # numbers for 1000/1100 cams with the same specs, and one superceded.

The physical difference in the cams from early to late is the large bearing journal on the LH end.  On the later cams it is narrower and further out, and requires a different cam end cap.  As below.  10B on left, 3V on right.


The specs as per the manuals, etc and as measured as below.  I don't have any of the bottom 3 cams to check for now.


I suspect that the 8P and 3V are the same profiles, with the lobe separation opened up (less overlap) for the bigger 1000/1100 engines.  The Evo cam is quite a bit bigger.

Comparing all:


The 8P and 3V.  


And the 3V and 10B, showing how much bigger the Evo's 10B is.

Saturday, April 29, 2023

Multistrada 1000 idling issue - Another (more complete) take on it.

 Some time ago I had a MTS1000 in that had been set up badly to overcome a non idling issue.  That was part of a minor service and not much disassembly, and I got around that electronically.  See here -> MTS 1000 not idling  That particular bike had a very vague history and a couple of dash replacements with no record of actual km.

A bit of MTS1000 info from that report - The MTS1000 was the first Ducati with an idle control valve ("stepper motor", etc).  Any model with an idle control valve doesn't need the air bleeds (the little screws on the sides of the throttle bodies that allow air to bypass the throttle blades) opened, as their primary function is to allow you to set the idle speed.  I also use the air bleeds to equalise the idle mixture between the cylinders, in which case you open the air bleed of the richer cylinder to lean it off to be the same as the leaner cylinder.  Meaning one air bleed should be fully closed.

Seeing air bleeds wound out on bikes with idle control valves really winds me up.  Just not how it's meant to be done.

Recently I had another MTS1000 in for an 80,000km service that I found in the same sort of tune set up - air bleeds wound out one and a half and two and an eighth turns and idle trimmer @ +20.  My response was to wind the air bleeds fully in and set the trimmer to 0 to see what happened, but there was no way it was going to idle successfully.

As I was doing a major service, and had just popped the fuel tank back on to run it, there wasn't a lot of time to be spent pulling it again.  That made it worthwhile to pop off the tank and airbox and have a looksee at the throttle bodies.  As below.


Icky.  But not unexpected for 80,000km, especially on a model where you don't pull the airbox for routine maintenance like you do a Desmoquattro for instance.  None of the 2V models really give you easy access to the throttle bodies to clean them at service.  So I broke out the Threebond Engine Conditioner - which despite the name is a throttle body/intake cleaning spray - and gave it all a good clean up.  I sprayed some down the idle control valve air hose as well, as they can also get claggy.

It's quite awesome for getting fuel residue and combustion gunk off.  I soak carb bits in it, but don't give them too long is my advice.


And Voila!  Lovely.


Back together again, it ended up with both air bleeds still full in and the idle trimmer @ +4, idling happily as desired.


Sunday, April 3, 2022

Undoing an electronic TPS reset on a non linear TPS model - in this instance an ST4S

 .
An issue that comes up with the 59M and 5AM ecu models is the electronic TPS (Throttle Position Sensor) reset capacity the diagnostic tools for these ecu have.  The electronic TPS reset is specifically for linear TPS models.  It has no place for non linear TPS models, but is often performed when it shouldn't be by people who have no idea what they're doing, and can cause issues as it overrules the underlying throttle opening to TPS output relationship to some extent.

How I don't actually know, I don't have the knowledge to understand what the software does when things that shouldn't be done are.

For those who aren't aware of the differing TPS styles and setting procedures, there's some info here:
On to the story - A fellow from interstate emailed me about his poor running ST4S.  The ecu had been reflashed by a Rexxer agent for the previous owner.  He had had it back to the Rexxer agent, who had performed a TPS reset via a diagnostic tool as he had also done when it was originally flashed.  It was no better afterwards.  In my experience the ST4S 59M Rexxer file is pretty good, so there should have been improvement to be had.

I replied that firstly, he needed to undo the electronic TPS reset.  The first time I came across this was a 2002 M900ie that was showing 3 degrees throttle opening on the diagnostic tool @ 700mV TPS output.  I had no idea what to do to fix it, but started guessing at what might help.  Given that flashing the ecu with my CDC tool tends to reset most background settings, I figured I'd try that.  So I read the file from the ecu and then flashed it straight back in again, just to make sure nothing else changed.

After that, the TPS voltage output to ecu diagnostic throttle angle relationship appeared to be about right.  I then carried out the appropriate non linear TPS baseline procedure and the rest of the tune set up and it was then fine.  Well, as good as a std ecu 2002 M900ie can be.

To do this himself, I recommended he download the Guzziddiag IAW5XReader and IAW5xWriter software from here and buy the required cable from Lonelec here for a guaranteed working set up. I also asked that he carry out each step of the process individually, and ride the bike afterwards to see what actually worked and what didn't as such, and provide me with the feedback.

Feedback as follows:

I reflashed the ECU with its original file as you suggested.  Bike ran better immediately. Misfire/stumble gone.

This was the part I was mainly interested in.  A simple before/after only related to the ecu reflashing, and it worked as I'd hoped.  The next part of it was the baseline TPS set up, and the impact of that depends on what has or hasn't been done previously, and how well (or not).

We then followed very closely your video and blog on the TPS reset.  The TPS looked new…no paint to be found at all  and had Allen screw heads.

The initial idle throttle angle was set at 1.6 deg.  With fast idle connection off etc it dropped to 1.3.  Backed out the butterfly throttle adjustment as directed.
We reset the TPS back to zero….played with this setting to ensure we were on zero and not under, as we were relying on the diagnostic tool we only had degrees.  We minutely jiggled the setting up to 0.1 and 0.2 degrees then noticed tightening the screws brought it back down a tad to zero.

So I am guessing its now pretty close.( If we had used voltage it might have been easier).  Reset the idle at 2.6 degrees (USA Bike).  Refit the fairings and took it for a brief ride.

Huge improvement.  Smooth throttle response from low revs.  Engine tone is different, no backfiring or popping on deceleration.  Idle is better, smoother.  
Slow commuter speeds much improved second and third gear 3000 rpm cruising very acceptable.

Again, an improvement as hoped and generally expected when the baseline is done properly.  It really disappoints me that so many of these bikes aren't set up right, and the rubbish reputation they get as a result.

Thinking about it now, as another possibility, you could also try doing another electronic reset to confirm what throttle opening value it resets to.  Then perform the TPS baseline set up procedure, but finish by setting the TPS output voltage to the theoretical corresponding voltage for the required throttle opening.  Ie, 2.4 degrees = 404Mv, 2.6 degrees = 423mV.  Then do another electronic TPS reset.  I wonder if that would also work.  Maybe someone can try it.
.

Sunday, September 20, 2020

Multistrada 1000 not idling - an ecu based solution.

I had an MTS1000 in for some work, part of which was a service after sitting for quite a long time.  One owner bike, but the owner's recollection of what has happened to it service wise over the years was one of the vaguest I've encountered, and the dash had been replaced twice under warranty so total km travelled was even less clear.  With the current odometer reading around 13,000km, I would assume it had had at least once valve clearance service, but I think that's possibly a poor assumption.

Compounding all this was the fact the bill, in dealing with a heap of other stuff, was rapidly closing on a number around the same as the bike's current value.  Which means I'm not too willing to go digging more than I need to.  On one of these, to get to the bits you need to for a valve clearance adjustment, you start removing the panels at the back, move all the way to the front, remove more bits then remove the tank.  Time consuming, and time is money and the money was running for cover.

So an "annual" service is what it got - fluids, timing belts, etc.  I checked the throttle set up, and that's where it went a bit hmmmmm.

The MTS1000 was the first Ducati with an idle control valve ("stepper motor", etc).  Being a 2003 model, it was also the first with the 5AM ecu, in this instance the 103 hardware version.  When they came out, I recall being told that the throttle opening, as displayed by the diagnostic software, was "throttle opening plus idle control valve equivalent".  So when you check the throttle opening angle cold you might see 4.5 degrees, and hot 3.5 degrees or so.  Confusing at best, but when that's what you've got to deal with, that's what you do.

Any model with an idle control valve doesn't need the air bleeds (the little screws on the sides of the throttle bodies that allow air to bypass the throttle blades) opened, as their primary function is to allow you to set the idle speed.  I also use the air bleeds to equalise the idle mixture between the cylinders, in which case you open the air bleed of the richer cylinder to lean it off to be the same as the leaner cylinder.  Meaning one air bleed should be fully closed, although some variation to that will be discussed later.

On this bike, the air bleeds were both open 1 1/2 turns.  The idle trimmer setting of +29 was also a bit concerning, but given the air bleeds were out that far, the trimmer setting didn't really surprise me.

I don't recall it being overly hard to start and get running when I first started it.  Not for a bike that had been sitting for 3 years anyway - the fact it even fired up surprised me.  As it warmed up I got set to check the throttle body set up and wound both air bleeds fully in to adjust the running balance, then got on to the idle mixture.

I found the mixture quite dirty, by which I mean it had a lot of Hydrocarbons and Oxygen in the sample.  This is usually an indication of richness, so knocking the trimmer back was the obvious thing to do.  Dropping it back to 0 both leaned it out (not as much as I might have thought though) and cleaned it up (not as much as I might have hoped though), but the dirtiness remained.  Sometimes, the best way to fix this is to crack the air bleeds a 1/4 turn.  It's amazing how it can drop the HC and O2.  I suspect it may have something to do with the black carbon crap that builds up around the edge of the throttle blade in its closed position, but when it's a couple of hours work to even check that out, you usually don't.

I ended up at 1/2 turn out on one, and 1/4 on the other for around 4.5% CO.  But the idle control valve didn't appear to be doing what I would expect on restart.  I tried doing the test via the diagnostic tool, but it didn't seem to want to do that.  I pulled the hoses off and blew air through the nipples into the manifolds, and they were clear, and with the ignition off the valve was open so I blew back through the valve into the airbox, and that was clear.  But when you turned the key on the valve went to the fully closed position as it's meant to, but then didn't come out again.  I sprayed some carb cleaner into the outlet nipples, then let it sit for a while, then blew that out and tried some Inox to lube it up and then it would, at key on, close then open again.  Fixed!

Not, as it turned out.  By this time the engine was cold.  With the little valve to manifold hoses back on, hitting the start button got a fire and run at very low rpm for 10 seconds maybe, then stall.  I pulled the hoses off, so it had no obstruction, and at that it idled a little longer before it stalled.  I could see the valve doing a little bit of movement during this, whereas previously it'd been doing nothing at all, and I was thinking maybe it's just too lean with the excessive air leak it now has.

Another trick I try with an idle control valve is to disconnect the valve with the ignition on, then with it disconnected turn it off and on again to make sure it has logged a fault, then turn it off, connect it again, turn it back on and clear the fault.  That can sometimes wake them up to some extent, but not here.

On a previous MTS1000 with an issue like this I had played with the base throttle opening (as in what I did to the SC1000 outlined in the Linear TPS setting report, which, I must say, hasn't really worked since) and tried different ecu files and it sort of ended up ok-ish, without being overly convincing.  But, as above, getting that into this one was not an option timewise.

When you have one of these idle control bikes that won't, one of the first things to do is a TPS reset, the electronic procedure via the diagnostic tool.  And, coupled with that, is making sure the idle stops haven't been played with.  There's a fairly obvious stop easily adjusted just behind the throttle cable wheel on the RH side of the throttle bodies, and fairly obvious tempts those that like to fiddle.  Not a good idea on these, but not uncommonly messed with.  The much less obvious stop between the throttle bodies is very rarely messed with, so you usually have a fail safe there.

So, particularly if the paint is missing, you wind that out and make sure it has no influence.  You can see the throttle opening change on the diagnostic tool if it is an issue.  I've seen winding that previously messed with stop out and doing a TPS solve issues like this before.  I must add, at this point, that I've also seen too tight throttle cables have a similar effect, back to the BMW F650GS days.

Anyway, I did a TPS reset to no effect.  I read the file out of the ecu and flashed it back in again (seen that work before).  Didn't help.  Tried a different file with the same result.  I was thinking I might give a 610 ecu and file a go, just to see if anything changed.

But I thought I'd have a look at the original file anyway.  The specified idle speed is no higher than 1300 rpm, but given it was nowhere near that I thought I'd raise it to 1600, just to see if anything changed.  Also, given that the engine would start then peter out and I've seen that due to not enough enrichment, I got into the start up table and richened the soon after start columns to see if that helped.

Below are target idle speed maps (1 row x 16 temp breaks is how you would define this one), which is measured against engine temperature, for two of the MTS1000 files I have, plus what I tried setting it to.


With the original files, the idle rpm I would have expected to see (if all was going to plan) was 1,300 rpm cold and 1,200 rpm hot.  Keep in mind that I didn't put 1,600 rpm in the target rpm table because I actually wanted 1,600.  I put 1,600 in because I wanted to see if it could do it.  There's no point changing it from 1,300 to 1,350, because it's too small a change to really notice definitively.  Make a big change - if it works, great.  If not, move on to the next thing.

The start up table is a pretty cool thing.  Back in the P7 days, there was only an engine temperature correction table to give enrichment for both differing engein temps and cold starting.  Now that might sound like the same thing, but there's differences in fuelling required based in how cold you're starting from and how long it's been running from cold.  I tended to bump this up a bit on some bikes, so that, at say 5 degrees celsius engine temp, it might have in the range of 40% enrichment to make it light up nicely.  I actually think some of the early 851 start issues, where people would claim the bike was "flooding", were due to not enough enrichment to start, but enough to foul plugs and send it all pear shaped.  Sometimes a bike will crank and not fire from cold, but if you let it sit for a minute or two then try again will start straight up, and I think that's because the residual fuel from the first hit, when added to the second hit, is enough and off it goes.  Just a theory.  I've seen lots of late model stuff - M1000, M1100, Guzzi Breva/Sport models like this.

But, with my 851, I find that if it's a hot day - say 30 degrees ambient - it'll fire then not be so happy because it doesn't have enough fuel to keep running due to the trim at 30 degrees not being enough for a "cold start".  Bump that up and it'll start fine, but then on a cold day it's already up and running by the time it hits 30 degrees engine temp and then it's too rich and gets lumpy as it warms up.

The start up table adds fuel based on rotations since started, and is a decaying enrichment table.  Adds quite a lot more fuel for the first 4 or so rotations, then starts dropping it off in the next 4, etc, up to 2,000 or 4,000 rotations, depending on the ecu.  This first appeared with the 1.6M, and it means the engine temp trim table has much less enrichment - usually in the range of 15% maximum.  But add the start up table's 20 - 30% and it'll fire up and go.

This is why the 1.5M ecu runs rich every time you start them for the first 3 minutes or so.  It was annoying there, but better applied here with the 59M/5AM series.

In this instance I made it 10% richer for the columns of 8 to 510 rotations since starting, which would be the first 30 seconds or so of running.  10% is usually enough to pick them up nicely.

But, none of that shit made the slightest difference.  Well, it smelt a lot more fuelly after I turned it off after a couple of 10 - 20 second poor running start attempts.

The next step was to look elsewhere.  One of my pet loves when trying to make things idle is ignition advance.  As in adding more.  These bikes have a separate idle 
ignition advance table, a single line map if you like - 1 row, 32 rpm break columns - and with that you can set the advance when the throttle is closed.  As the lowest rpm break point is usually 900 or 1,000 rpm, it's well under the desired / target idle speed and you can usually taper the amount so at 1,000 rpm it might have 15 degrees, but at the rpm you want it to idle at - and here if it has an idle control valve you need to look at the target idle speed as set in the ecu file - you can drop it back to maybe 10 or so degrees, and then the same again at the rpm break above the target idle speed so the idle is nice and stable and not trying to hunt higher as it picks up engine heat, etc.  Meaning when it's cold and not wanting to idle high, the increased ignition advance at the low idle speed will help keep it running.

On old 851SP - 916SP, which have 290 to 300 degrees cam duration at 1mm lift, you can go up to 25 degrees or so advance at idle and the difference can be quite amazing.  I
gnition advance really is the best stuff.  I have an 851/888SP2/3/4 eprom that has the break points moved around a bit so it has 25 degrees advance at 1,000 rpm and then 15 degrees advance at both 1,250 and 1,500 rpm.  That way it has a heap of advance to support the low idle when cold, and less at the desired 1,250 rpm idle speed and then not changing for 250 rpm so that the idle speed is nicely controllable.

Anyway, I'm meandering - if you have an idle control valve as the MTS1000 does here, and it's doing its job, then you won't have a low idle speed at cold idle.  Well, you shouldn't, and that was the problem with this MTS.

Some of the files have quite surprisingly low ignition advance numbers at idle, in the range of 0 to 2 degrees.  Not as bad an many of the MV models, which have retard, but still enough to lead to some idle instability.  Part of the table from the MTS1000 file is shown below.


Now, some are possibly thinking that going from 0.5 degrees advance to 15 degrees advance is an extreme change.  Correct, it is, but again it's a case of making a change that is noticeable, and really a change that you want.  I usually use a rule of (preferably) at least 10 degrees advance per 1,000 rpm.  That's a bit ish, depending on what you're doing, but it's certainly a lot more valid than 0.5.  At low throttle opening cruise I'll usually add another 5 to 10.  Some of my revised ignition maps for the late models bikes will see an additional 10 to 15 degrees at low throttle over the original.  For an MV, more.

Given the target idle speed is no lower then 1,200 rpm, the advance under that is somewhat irrelevant as long as the idle speed does what it should.  But if it doesn't, or the engine speed drops under load, it should recover.  With 5 degrees less at 1,400 rpm, there's no chance of the idle creeping up, all else being equal.  The advance above that rpm can influence how the engine returns to idle once the clutch is pulled in, and having it low there gets rid of any holding up issues.  Some of the Guzzi Breva/Sport models would do that, and cutting the advance down a lot would fix the issue.  It's not really otherwise important - there's no actual running condition where the engine needs to support load at 1,800 rpm with the throttle closed.  I did have a 1098R like that at one point - it was an issue with them I was told.  I had one go at it, but I think the owner decided I was a dickhead before letting me have a second try (it can be an iterative process), so I didn't get to fix it.

With the increased ignition advance change, the bike idled happily from cold.  As the engine temp rose, the idle speed started creeping up too, getting to over 1,400 rpm before I turned it off.  That made me realise that the issue previously was it wasn't capable of reaching that rpm.  Why I don't know, as it would have been fine when new like that.  Possibly it had a lot of closing clearance, and the high hydrocarbons could back that up.  But it was much happier now, and a win's a win.  With that, I reset the target idle speed and start up tables back to their original setting, meaning the only ongoing change was the ignition advance at idle.  Well, that and the idle trimmer not being +29 any more, which I would hope had made a decent change to how it ran.

Saturday, July 11, 2020

Exhaust design - 2 into 1 versus 2 into 2 on the Ducati 400SS

.
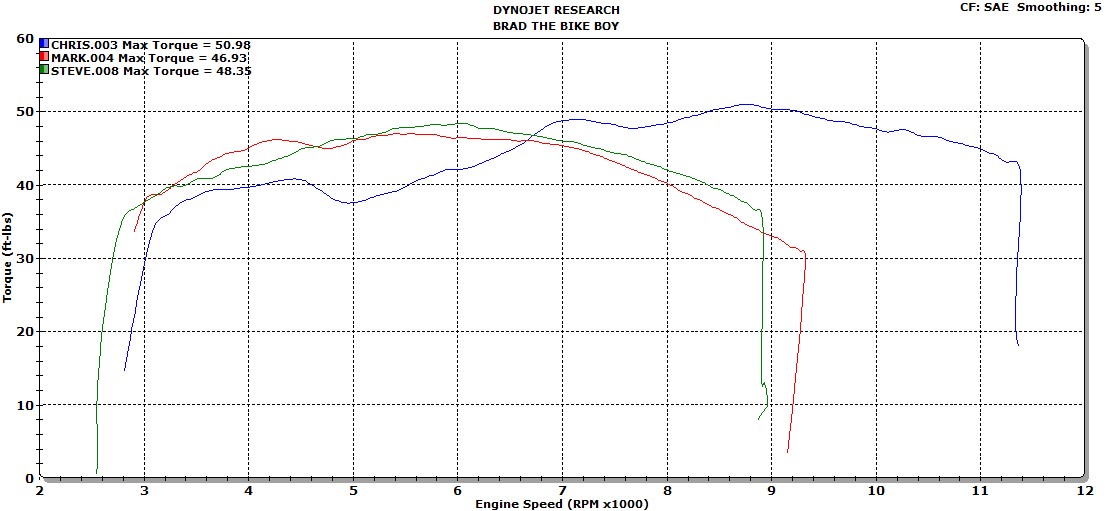
Although my 400SS is one of the 20 officially imported into Australia in 1993, I didn't know anything about them until we had a second hand one come into Moto One a few years later, and we all stood and laughed at its slowness.  I did however take the chance to dyno a 600SS once to compare the 2 into 1 header to the M600 40mm 2 into 2 header.  All the 2V Monsters - 400 to 1000 - had 40mm headers std.  When I did the M600/600SS comparison the whole "different bike" thing may have clouded the result somewhere, but comparatively the 2 into 1 600SS (blue) made a little more power under 4,500 rpm and less power above that.  But bike and muffler differences may have clouded that.


So with the 400SS back together I took the opportunity to test the 2 into 1 versus the 2 into 2 that it wore in the Monster.  As to what is the same, well - engine, cam timing, gearing, rear tyre (the same actual tyre), muffler (ever dependable Megacycle).  Different - carbs, carb jetting, exhaust headers.

The 2 into 1 header came with the 600SS when it arrived in 1994.  To help distance it from the 750SS price point wise (the 750SS also gained a second front disc for 1994), it had the 2 into 1 header set from the 350 / 400SS.  The 350SS came with an aluminium wrap black steel muffler like a 750SS (not sure if it was the same part or not) and the 400SS had the aluminium sleeve muffler like the 900SS.  The header itself was smaller in diameter than both the 750 (which was 35mm od) and the 900 (40mm od) and the primary tubes were quite a bit longer.

Photo shows 400SS 2 into 1 on left, M600 2 into 2 on right.  The 2 into 2 features the stamped steel crossover which originally appeared on the 750 Paso and is truly an inspired design for an otherwise complicated part made simple for volume production.  It works a treat.  My 2 into 1 (hereafter known as "original header chopped up into kind of crappy 2 into 1") not so treat filled.


This being the original header chopped up into kind of crappy 2 into 1.  Blue lines indicate the flow path from one header into the other, possibly part of the problem.


The result surprised me a little, given what I thought I might see based on the above graph.  But it also backed up the few other tests I've done with 2 into 1 exhaust.  That being, a 2 into 2 always works better.  Never seen it go the other way.

As to what those other results are, I can think of two of my own.  Moto Guzzi Sport 1100i, where I made a full exhaust for the bike with 2 into 1 and 2 into 2 cross overs.  Otherwise same header and muffler.  Green is 2 into 1.  Had a noticeable top endy feel to it.


And Minne (M600 with a 750 engine) before the valves, cams and comp, fitted with an old Gio.Ca.Moto M600 2 into 1.  43mm od pipe into 48mm od collector, of similar design to the 400SS 2 into 1, but with lots of spring joints, etc.  Red is 2 into 1.


I was also told many years ago that the improvement the Aprilia / Akrappovic accessory 2 into 2 full system brought to the first gen Mille (std 2 into 1 exhaust with the great big muffler) was more midrange.  Which again is contrary to the 2 into 1 myth.

So that's my background to the 2 into 1 thing.  

The graph below shows the 400 engine in the SS with the 2 into 1 in red, in the Monster with the original 40mm M600 2 into 2 headers in green and in the Monster with my original header chopped up into kind of crappy 2 into 1 in blue.  Peak power at just over 80mph is 9,500 rpm.  The 400SS top end air/fuel is an issue, and with more main jet it may make more top end power.  The red curve certainly improved a couple with more air to offset its richness.  The midrange air/fuel is similar to the Monster jetting, so comparatively at least should be similarly crappy.


While the original header chopped up into kind of crappy 2 into 1 did give a stronger bottom end (compared to the 2 into 1 of the green curve it has shorter, larger diameter primaries so it's not following the myth there either), it all went pear shaped over 7,500 rpm.  Realistically, that's about as hard as I revved it anyway, so for me it wasn't a big issue.  But the knowledge that I'd made it somewhat worse annoyed me.  I think it's the way I modified the stamped sheet cross over into the 2 into 1 merge, and maybe the fact that it's all the same diameter isn't helping.  But I'm not inclined to find out and that header set only fits a small block Monster with rear sets so it's a bit restricted in application to play with.

Comparison of the two 2 into 1's below, 400SS is blue.  The funny thing is that the 400SS has a real pick up in performance you can feel around 7,000 rpm.  Maybe it's as the fuelling goes from too rich to too lean, dunno.  Definitely noticeable, whereas the Monster with the 2 into 2, which has a much less smooth dyno curve, wasn't.


Torque and air/fuel shows the taper in the 400SS air/fuel curve that I'm sure you can feel as it gets better (before going to shit).


The jetting also varies a bit - they're kind of wacky.  The 350SS and 400SS std jetting variation is bizarre for what is essentially the same bike, produced at the same time.  The jetting I'm using in the 400 is not quite std.  They use a much softer slide spring than anything else - it's almost like a Factory Pro or Dynojet spring.  I did have them in it when it first went together, but swapped the heavier "in everything else" springs into it to make it a bit richer.  Maybe too rich now, not sure.  Everything except the 600SS use larger holes in the slide with the heavier springs too.  Maybe that transfers more vacuum to the diaphragm.

JD Hord made the comment on Facebook that "I did a bunch of messing around with springs on a Honda Hawk one time, and best I could tell, at steady state they had barely any effect, but throttle response did seem slightly better with heavier springs. I suppose that's because it would pull more vacuum and get fuel moving a bit quicker into the airstream."

It did seem to help the throttle response and starting, but I also richened the idle mixture a bit as well.


The 2001 M400 uses the same spec carb as all the M600, so I ran the original M600 carbs on this engine when it was in the Monster.  The jetting is quite different in those two, but the midrange WOT fuelling is similar on the dyno.  I've got a heap more mindless rambling to do on the jetting stuff, watch out for that blog post - it'll be coma inducing.

Sunday, June 28, 2020

Playing with a Ducati fuel level sender

.
I put a post on my Facebook page a while ago about Dcuati parts not being covered by warranty if not fitted by an authorised workshop.  The part that prompted that was a fuel level sender I had purchased for a mid 90's 900SS.  The dealer I bought it from did cover it for me, but that was what they were being told.

Anyway, in that case my customer needed a fuel sender for his 900SS as the light wasn't working.  Shorting the terminals in the loom tank connector made the light come on.  Pretty easy diagnosis.  I ordered one in, fitted it, made sure the light was on with the tank empty then put the fuel back in it and made sure the light went off.  It did.  Bingedy boom, Bob's ya f--king auntie.

As it turned out, Bob was an imposter.  The owner called to say the light wasn't coming on.  He came back, I ran the test again as above - no light.  I ordered another sender and when it arrived it was fitted and job done - I haven't heard of any further issues.

Which meant I had this dud sender on the bench.  The dealer didn't want it back, and I tend to keep all this sort of stuff just because connectors, etc, can be handy.  And I was also convinced that when I had fitted it, I'd checked it properly.  But, as with most things that end up on a bench, it had sat simply because I'd had no need to consider it further.

Until Friday, when the 400SS hit the road.  Although I've owned this bike since 2012, its never been near the road as a bike, and there were a few things about it that I didn't know.  Given how much of a dud it was when I bought it (imagine an Ebayer not telling the whole truth!) I shouldn't have been surprised when I realised on Friday, while heading over to see the club man for the permit papers, that the trip meter wasn't doing anything and that I should have been quite a bit through the 5 litres of fuel I'd put in the dry tank after it was painted.  Enough that the fuel light should be on.  I made a precautionary fill up on the way back and put over 14 litres into it without trying, so it was low.

The sender in the bike would most likely be the original, certainly it's the old design.


The current sender to suit the carby SS, 59210161A, is one of the typical black plastic tubes types with the correct eyelets for the fuel pump terminals and is around $330 locally.  As such, I was pretty keen to not have to buy a new one.  Hence my decision to pick up the alleged dud and see what happened.  I plugged it into the connector, turned the key on and waited the 20 or so seconds for the time delay and the fuel light came on.  Result!  Turned it upside down, heard the float go clonk, light off.  Turned it up the right way again, wait 20 seconds, light back on.  Ok.  So what's wrong with it you might ask?  I certainly did.  I figured I might as well fit it properly and see what happened.

59210161A, image stolen from Belt and Bevel, who allegedly have one in stock.


Short answer - what happened was, it didn't work.  Things started well - the light was on when the tank was empty.  But it didn't go out terribly convincingly when it was covered in fuel.  I usually find these things like some sort of vibration to bring the light on - I often do these tests with the engine running or, if not, tap the tank gently repeatedly.  In this instance, that developed into me going it perhaps a little more aggressively than ideal with a long screw driver handle and eventually the light went out.  As anticipated, it didn't come back on when the fuel was drained again, so out the sender came.

Taking a step that I usually don't with a new "sealed" electrical component that doesn't work, I thought I pull it apart and have a Captain Cook.  Nothing to lose anyway.

The top has a small metallic stud sort of thing on top, which looked to me like it might be solder.  Applying the soldering iron confirmed that, and the solder shook off.  The plastic cap turned out to not be retained by that though, it just clips in and out


The solder retains the little steel top hat that stops the float.  Once the solder was gone, it pulled off with a little twisting with pliers.


Taking the float out, it looked to me like it had some ridges at the ends that were maybe jamming, so I put it in the lathe and tried to machine it a little.  In hindsight, I wouldn't recommend doing that at all.  It looked like something hard, but it sort of powdered when I hit it with the tool and it's also soft and doesn't hold too well.  I made a bit of a mess of it, and then wondered if the outer was some sort of sealing cover that stopped fuel getting into the float's foamy cell.  I guess if it does fill with fuel the light will just stay on.  Note to self time.  Undesired result is below.


Reassembled and refitted again, it delivered a similar result. This time, after the sender was covered with fuel, the light just wouldn't go out.  No amount of tapping, etc, made any difference.  In an attempt to move it around a little, I lifted the front of the tank and noticed a heap of air bubbles coming out the two little holes in the cap.  I found that a little odd, so drained the fuel and removed the sender again - this time keeping it upright hoping what was wrong inside it might not change.  When I popped the little cap out, the float was up and the unit was still full of fuel - an obvious problem.

The reason that's an obvious problem is because there's a hole in the side.  Well, there's meant to be.  Looking at the "hole" in the side a bit harder I realised that the drill hadn't been leant on hard enough.  


Leaning on a 2mm drill a bit harder, I got this:


With that, I reassembled and refitted again with supreme confidence, confidence rewarded with a fuel light going off then coming back on with variations in fuel level.  Woohoo!  Fixed.

Of course, I then re-entered the living hell of getting the fuel cap carrier rubber surround ring back in place.  When I reassembled the tank a couple of weeks ago I finally managed to stretch the rubber enough to get it to stay in place long enough to jam it into the top of the tank.  This time, I gave up and borrowed a pair of hands.  I haven't done that for at least 11 years.

All I have to wait for now is my molested float to fail.
.

Friday, July 5, 2019

Ducati 2V valve clearance, timing belt and cam timing videos

.
Mike Wallis, who does my website, also does video production and runs a Youtube channel called Mike's Machines, so he came in one Saturday and we shot some footage of me banging on while doing a 2V valve clearance adjustment.  Videos here:


.

Wednesday, January 2, 2019

A comparison of 2V and 4V Ducati 750 engines

.
When I did my 2V cam profile measuring (here), I had the chance to test a theory that I had, being that the cam profiles for the 4V Strada cams - marked A1 - were simply the 2V profiles of the time - the F1 cam that became the R grind used in the 600 and 750 engines from 86 to 02.  Turns out I was probably half right.

The inlet profile looks mostly the same.  The exhaust has a fatter nose for want of a better description, and is more asymmetrical, biased to the retarded side.  I found it a bit odd that they would just use the 2V profile, but while in reality the 2V cam was lacking quite a bit of lift when used with the 41mm inlet valve in the 750 F1, its 9.5mm of lift was more than enough for a 32mm inlet valve (as the 748cc 4V initially had).  Lift required is based on the fact that a poppet valve flow area - if you like the curtain you get around the valve od when lifted - is equal to the valve head area when the lift is 1/4 of the valve head diameter.  So if you have 32mm valve you need 8mm lift.  And 41mm needs 10.25mm lift.  It's a rough guide sort of thing.  By the time they got to the production 748, the inlet valves had grown to 33mm and exhausts to 29mm.

(Thinking back to the above now, after having written much of what follows, I've come to the conclusion that this comparison is flawed from the start.  The 750F1 cam simply doesn't have enough lift for its valves.  Maybe someone on the 4V project at Ducati (Bordi and his team) saw the profile and thought "That's about right for a 32mm valve, I'll have that".  Fair play to them.)

(And another - the 85 750F1 has small 500 Pantah valve sizes, so maybe for them the valve lift was ok.)

To the profile comparison.  Blue and red are A1 inlet and exhaust, green and orange the R inlet and exhaust.


I then wondered if they'd used the P grind from the hot F1 series - Montjuich, Laguna Seca and Santamonica - for the A cam used in the 851 Tricolore Kit and SP series.  But clearly not, the P has much more lift and more duration.

Some time later it occured to me that this meant there were a couple of engines from the same manufacturer with the same bore and stroke using the same inlet cam profile and a similar exhaust cam profile in both 2V and 4V configurations.  Those two engines are the 750 2V and 748 4V, both with bore and stroke of 88 x 61.5mm.

As such, I thought a comparison of 2V and 4V was in order.

In basic engine design, the potential peak torque value is based predominantly on capacity.  There is a measure called Brake Mean Effective Pressure, which is basically torque per cc, and it's somewhat consistant with similar engine designs and a measure of efficiency, both volumetric (how much air the engine can suck in and then trap) and combustion (compression ratio, chamber design).  The actual outright potential efficiency in terms of energy in versus power out is related to the compression ratio, although measures to reduce losses are a big part of engine design these days.

In contrast, the potential peak power value is not capacity based, but air flow based.  Simply, how much air can the engine flow through itself.  This also overlaps with mechanical design and maximum rpm potential.  If you're designing an engine for racing, for instance, you'd start by defining the maximum rpm you're going to use, which is mostly bound by piston speed.  Maximum piston speed is not an enforced limit, but a number that is in reality a development boundary to be pushed and see what happens.  The old "to finish first, one must first finish" kind of thing.  Usually defined as "mean piston speed", which is the average speed over the journey from top to bottom.  The actual maximum piston speed, which occurs about mid stroke, also varies with connecting rod length.  Seems that 30m/s is about the current maximum "mean" used.

With the limits of capacity and maximum piston speed set, the stroke is defined and then the bore defined by that.  Or, in MotoGP for instance, where the capacity limit is 1000cc and bore limit 81mm, those limits give a minimum stroke of 48.5mm, which in turn, if the maximum rpm used is 17,000, gives a minimum mean piston speed of 27.5m/s.

This can also depend on physical properties of components used too, and the limit there, if not specified by rules, is generally cost.  The old "how fast do you want to spend".  As a guide, when Ducati were at the end of the 999 race life, they were revving them to 14,500rpm to try to be competitive.  With a 63.5mm stroke, that gives a mean piston speed of 30.7m/s.  Pistons and connecting rods were not limited by the rules, though, unlike the 1198 era when production parts had to be used.  Through material spec and cost, this effectively limits the maximum mean piston speed indirectly.  This, along with the physical limit of further enlargement of bore size on the Pantah derived 1198 crankcases, is what led to the Panigale engine development.  Bigger bore means shorter stroke, and the shorter stroke was what they needed at the time.

The main secondary variation in terms of possible peak torque production is that the 4V engine has more compression, which realistically is 1/ simply a by product of the required (and better) pent roof combustion chamber design, and 2/ also permitted by that same chamber design with its ability to better resist detonation - ie, a smaller, shallower chamber with valves at a much smaller included angle, large squish areas and a central spark plug.  It is also water cooled, again making it a better high performance engine.  So the generic 4V pent roof head configuration has combustion chamber design advantages you can't get in a 2V without restricting valve size markedly.  The 2V chamber in the 750 engine is a (largely) hemispherical type chamber, which tends to give a deep chamber with much more valve angle than the 4V design simply to get the required valves in.  If you want high compression, you use a piston with a dome that in itself causes issues with flame front travel and increases the potential for detonation.

In so many ways the shallower 4V chamber and flat top piston are just better.

748 chamber on the left, 750 on the right.  748 valve sizes are 33/29mm inlet/exhaust, the 750 is one of my bigger valve heads with 42.5/37mm.  Std 750 is 41/35mm.


Comparing power and torque outputs was the aim of this, so we'll get into it.  Blue is 748, red 750SS and green 750SSie.


The power graph shows the 748 peak power value around 50% more than the 750, at an rpm similarly 50% higher.  This makes sense, as power is defined as torque x rpm.  Same torque at 50% higher rpm will give 50% more power.  If you compare the valve sizes, the 748 has about 30% more valve area.


The torque output, on the other hand, shows some of the implications of trying to spread the rpm range over which the power is produced.  The 2V curves are both generally just rounded curves, whereas the 748 has various peaks and troughs.  This is usually what happens as you widen the rpm range you're tuning for.  At lower rpm, as a general rule, you want things to be longer.

The difference between the 750SS and 750SSie is carburettors vs fuel injection.  The 750 engine with the Mikuni carbs has long inlet manifolds that position the carbs side by side.  The 750 ie engine has much shorter manifolds and throttle bodies arranged at 90 to each other, giving the appearance of a much shorter inlet tract.  In reality, the carb model has short rubbers into the airbox, whereas the ie model has much longer rubber trumpets inside the airbox (much longer on the vertical cylinder) that would mean the overall trumpet to port dimension would not be that much different between the two models.  Keep in mind everything else engine wise - heads, valves, pistons, cams - are the exact same parts.

One thing that is done when you try to extend the power range is to make the inlet shorter.  This helps the overall peak power value, but while it also reduces the peak torque value, it will increase the average torque figure over the wider rpm range and introduce the peaks and troughs.  The narrower the rpm you tune for, the more specific you can be in your tuning setup - inlet length, etc, and that will lead to a higher peak torque figure.  Great for a unique application such as a stationary engine, not so good for general motorcycle use.

There is a great dyno graph that I have never been able to find online - the only place I can recall seeing it in Sir Harry Ricardo's book - from D type Jaguar testing that shows the power curve with inlet lengths varying from maybe 6 to 36 inches.  At 36" the peak torque is well above that of 6", but the rpm range is much narrower.  As an implications and compromises of tuning illustration, it's particularly simple, elegant and quite definitive.  I might have to go to a Uni library and photocopy it some day.

Another point here is that while the inlet cams in this instance are all spec'd at the same timing - 119 degrees inlet centreline, with the exhausts at 106 on the 2V and 112 on the 4V, in reality the 2V would be pretty close to that or even maybe 1 or 2 degrees advanced, whereas the 4V would have all cams retarded to some extent.  We used to find 4V inlets from 5 to 10 degrees retarded out of the box, and when we reset the timing to 108/108 we did sometimes move inlet cams over 20 degrees.  This gives a better shape to the 748 torque curve, as below.  Blue is as delivered, red 108/108.


Incidentally, when this cam first appeared in the 750F1, the timing was 10 degrees more advanced than in the 750 Paso, which makes much more sense to me.  I have read that the timing was changed for "emissions" reasons, which really makes no sense to me as there was no motorcycle emissions testing back then.  I'd speculate it was done for two reasons.

1/ The Paso, with the longer inlet manifolds and Weber carb, had a more midrange orientated power delivery, and retarding the cam timing gave a power delivery more in keeping with what was expected and helped increase the outright power figure.

2/ With the fully enclosed body of the Paso and a compression ratio much the same as the F1 (spec is 10:1 in the Paso manual), even with the oil cooling system I'd think the risk of detonation would have been higher so retarding the cam timing would reduce the midrange cylinder pressure.

By the time the 750SS appeared it had pistons which are the slightest bulge off flat, and the listed compression ratio of 9:1 meant that there was no detonation in sight.  The other difference with the later pistons was that the inlet valve reflief was shallower, so the most advanced I was game to run those cams was 114 degree inlet centreline.  Not sure if you could run 110 on a 750 Paso or not.

Comparing a 750SS with timing at 119 and 114 we get the following.  If we could have run 110 and picked up a little more at the 5500 rpm torque peak and lost a little more over 8000 rpm it would definitely impact the feel of the power delivery, and that may have been a bad thing when you only have 2V motors on offer and people who just love pointlessly revving the snot out of things.


Inevitably, the two previous graphs lead to this one, being 748 vs 750 with more consistant cam timing settings.


Peak torque is almost the same, peak power about the same difference as before.


Yeah, but.....

Frankly, there's more yebits to this story than story.  It was sort of a good idea that has, realistically, taken it in the neck quite a few times along the way.

One could argue that we could make the 750 engine a better one for this comparison by giving it a different cam with more appropriate lift.  Totally negating the comparison, of course.  And its under valved, so lets fix that too.  And the comp is too low compared to the 748.  Luckily, I prepared one earlier.  My 750 engine with 900 cams, 42.5/37 valves and Ferracci 12:1 pistons.  The 900 cams have 12 degrees more duration and 2.5mm more lift.


Even though the cam duration has gone up, the torque curve is still a single peak, typical of the 2V motors.  

But, if we're going to make the 750 a bit better, we can make the 748 better too.  Along the way they had a couple of goes at the 748.  The SP/SPS with its great big old school cams, and the R with the bigger throttles and valves and half big cams.  Neither made a better road bike - it always dismayed me when people who bought 748R came in and claimed their old 748 had more midrange.  Of course it did.  The concept of an homologation special is not understood by many.

748 in blue, 748SPS in green, 748R in red.  Different shape curves, or more importantly, different amounts of torque over 10,000rpm.  Where the power is.  But, the peak torque value is pretty consistant across the 3, as it has been for all the graphs so far.


But (I'm liking these buts), if we're going to improve the 750, we might as well improve the 748 too.  Properly.  That involves bigger valves again - 37/30.5, larger than the 748/748SP at 33/29 or the 748R's 36/30, but reduced cam duration - at least 20 degrees on the inlet and 16 on the exhaust with appropriate lift.  Let's call it a 749.

The totally different exhaust designs may influence the 749 output, but in comparison to the above 748's adding a base model 749 curve in burgundy shows how much better it is.  Again, 750cc so similar peak torque, but the shorter cam duration and bigger valves combine to give better low rpm and high rpm torque compared to the 748.  The valve of good heads and just enough cam.  Although, on the road, it's kind of a boring power delivery.  Having the torque rise more noticeably with the rpm does make them feel more racy.


Power curves show the 749 is much more linear.  I think it'd make a good naked bike motor.


I might stop there.  I've kind of lost the direction of this, which really is just me thinking about it too much.