I made up a fairly basic jig to hold a 2V head and a couple of dial gauges so I could plot out some 2V cam profiles. I used a spare 400 head I have which is a 3 bearing style head, as opposed to the later 620/695/800 2 bearing head.
For test samples I had the following, with their Ducati specs and the measured specs for comparison. Click on any image or graph to make it bigger as required. The dyno graphs are generally from various reports if you want to look for more info there.
I borrowed some P (Montjuich, Laguna Seca, Santamonica) and 8J (900ie) from Chris Boucher and Peter Nuss on the TT1/F1 forum, so a big thank you to them. The 2S 620 cams had been modified to go into the 3 bearing head as used in the previous installment of the Minnie the 400 debacle. I didn't have any 800 cams (3X and 3U?), and they wouldn't fit into these heads anyway.
The rig was very much analogue. I did look at some digital dial gauges with outputs, but the cost put me off that pretty quickly. I did the testing at nights, which involved me sitting down, reading the degree wheel and dial gauges every two degrees of cam rotation and typing that into my spreadsheet. It started out as fun, but after the first couple it got a bit dreary, and by the last two was just downright tedious. I was very glad to see the end of the job.
Because I was reading the degree wheel every two degrees, I have cam lift values corresponding to every four degrees of crank rotation. I wasn't going to take readings every degree of the degree wheel - I would have lost my mind.
The result is the following.
Separating the Pantah head cams out (vertical cylinder carb at rear of head), the following has the Pantah (labelled PH in the chart), F1 and P cams. The F1 cam is the same profile at the R, but ground 8 or so degrees advanced. I had a set at one time that had OE and MV stamped on them. To accommodate the higher inlet valve lift at overlap (inlet valve opening) that advance brings, the F1 pistons have comparatively deeper valve reliefs than the later 750 pistons. From memory they have higher crowns too for more compression. Although both would be less than that required for the P cams fitted to the Montjuich, Laguna Seca and Santamonica models.

Immediately obvious is the extra duration and valve lift of the P cam. It's what I would call old school, and what would have been referred to back in the day as "race", or even "full race" if you were going for effect. Cue the oohs and aahs and air sucked through teeth. As with most of the old school race stuff, it's kind of crappy now that good ports and cams are well understood. The greatly increased valve lift at overlap (exhaust closing, inlet opening) is what requires far deeper valve reliefs.
I don't understand what it is about the F1 cam that made them want to use that over the original Pantah cam. Similar 1mm lift duration and less lift doesn't really seem like an advancement to me. Bruce Meyers told me the Pantah cams were better in his experience, and now I can see visually that I would expect that to be the case.
Next the "Paso" style engines, which simply means vertical head rotated with inlet at the front. Although I think it was the prototype Elefant that first displayed the reversed head in 1983. Anyway, they started out with the R cam, then with the 906 came the HT cam, the HZ in the ST2 in 1997 and the 8J in the 900SSie in 1998. Also available for them were the Vee Two cams, the 210 grind being the same as the DP 06090 and Gia.Co.Moto GM09 and the 212 grind.
The 2S grind, which was fitted to the new 620 engine of 2002, was the first of the two bearing cam fitments. This cam was only fitted to the 620. The 800 also used the two bearing cam with similar duration to the R cam, but with 1.5 - 1.8mm more lift. This was marked 3X (also 3U?). It specs like quite a good cam and worked well in the 800, which made 900 ish hp with the 900 size valves, but 15 or so degrees less duration. This cam was then used in the M695 and M400ie.
First up, R vs 2S.

Dyno comparison from Minnie the 400. Red is R @ 108 inlet centreline, blue 2S @ 112 inlet centreline and green 2S @ 107 inlet centreline.
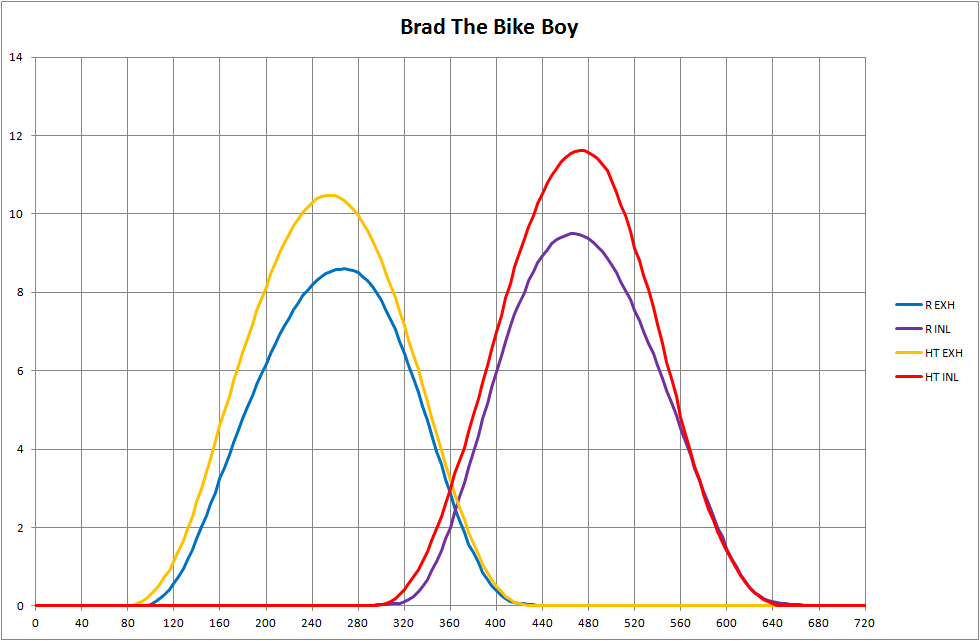
R versus HT. The R cam was also used in the W head M900 engines and the Cagiva Elefants and Gran Canyons.
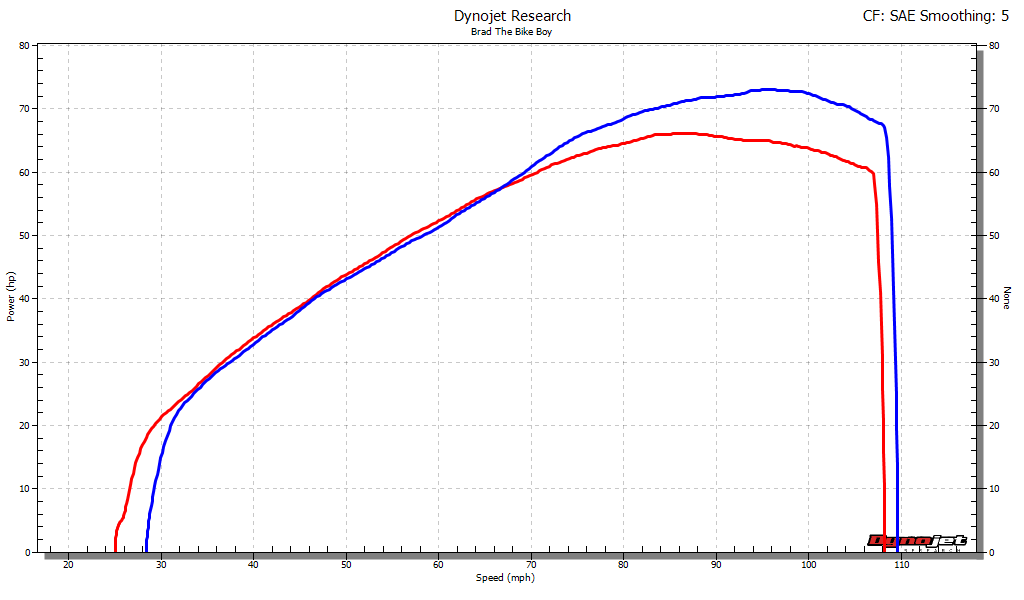
Dyno comaprison from my M750 with ported, big valve heads. R @ 114 is blue, HT @ 107 is red. I later realised that I had taken some ignition advance out of it which did hurt the power at the top end. But I assume both curves would have been similarly affected. It was nowhere near as much change as I expected (or had hoped).
This is a 750SSie I did prior to my M750. Green is R as delivered, blue is HT @ 119 and red is HT @ 107. I did quite a bit of tuning to it with the HT cams @ 119, both fuel and ignition advance. The 107 run is with the same mapping, just a cam timing change after the engine came apart and the piston inlet valve reliefs were machined 1.5mm deeper to allow more cam advance.
Removing the HT @ 119 run makes it a bit clearer.
R vs 8J
Dyno comparison from a Cagiva Gran Canyon, which is a 900ie engine with the W heads - R cams and 41/35mm valves. We fitted 8J cams to it set to 106 degrees inlet centreline in the hope it would make some more power. Not enough, as it turned out. It was still 8 or so down on the 900SSie engine with 43/38mm valve V heads.
The 900 cams - HT, HZ (ST2) and 8J. The ST2 cam has gained a reputation for being the best, and of working well in a 900 carb engine, but I've never seen any dyno proof of that.
There's really not a great deal of difference between the 8J and HZ. The 8J inlet peaks a little earlier and longer. If you compare the area under the curves, again there's little difference.
If we add the two Vee Two cams to the above, you get a somewhat confusing graph, but the two Vee Two cams stand out for their similar exhaust profiles to the HZ and 8J and their similar inlet profiles to each other. The 210 definitely works at a lower rpm range than the 212. Both of these cams don't match their specs, as below:
HT vs 210. The inlet duration is not much different, and the 210 certainly has a lot more area under both curves. But the lesser exhaust duration is what hurts it at the top end.
Dyno comparison of a 900SS, fitted with Omrae slip on mufflers and otherwise std. Well, I believe the after run is the first of the tuning runs. Red is HT as delivered, probably in the 113 - 115 degrees inlet centreline range, blue 210 @ 105 I think. It certainly picked up the midrange, which is what the long manifold carb motors are all about.
That's it for direct comparisons. I'll finish by quoting Bruce Meyers, who has a lot of experience playing with these engines. He posted this in relation to hotting up the 800 engines on a forum some years ago, and I think it's a good piece for reference:
--900SS Carby cams: give a nice increase from 4000 rpm up with avg +4 rwhp over stock cam.
--ST2 cams: Net a bit more on top end rwhp with no loss of midrange.
--900SSie cams: Net alot more on top, maybe 2-4 more rwhp than carby cams but a slight loss
at 4500 rpm. I think that dip could be tuned out with a good pipe.
--V2 212 cams: Exactly the same as 900SSie cam results
--V2 210 cams: Exactly the same as ST2 cam results


